Appearing in "The Death Ray of Dr. Zemo!"
Featured Characters:
- The Howling Commandos
- ⏴ Sergeant Nick Fury ⏵
- ⏴ Corporal Dum-Dum Dugan ⏵
- ⏴ Gabriel Jones ⏵
- ⏴ Robert "Rebel" Ralston ⏵
- ⏴ Izzy Cohen ⏵
- ⏴ Dino Manelli ⏵
- Percival Pinkerton ⏵ (First appearance)
- Jonathan "Junior" Juniper (Photo)
Supporting Characters:
Antagonists:
- Nazi Germany
- ⏴ Doctor Heinrich Zemo ⏵
- Adolf Hitler (Photo)
Other Characters:
- Schmidt, German doctor
- United States Army
Locations:
Items:
- Zemo's death ray gun
Vehicles:
- U-boat
Synopsis for "The Death Ray of Dr. Zemo!"
The Howling Commandos return to base with an entire SS company as prisoners. They meet their new member, Percival Pinkerton (who replaces Junior Juniper, killed in issue #4). Sawyer sends them to Germany to capture Doctor Zemo, a Nazi scientist.
On a PT boat in the North Sea, Ralston spots a periscope. The U-boat prepares to fire a torpedo. Fury orders the captain to drive straight at the sub, which tries to dive. The boat breaks the periscope, leaving the sub blind and unable to submerge. Manelli goes to a nearby shore battery, steals a helmet from a sentry, and orders the gun crew to fire at the "English" submarine offshore. He then drops a grenade into the bunker and destroys the gun, allowing the PT boat to escape.
Trotting down a road, the squad encounters a patrol tank. Jones vaults on top and drops a grenade inside, which disables the tank but leaves him with shrapnel in his leg. Dugan carries Jones to the next village, where the commandos try to convince a German doctor to treat Jones. Only when Fury lights a stick of dynamite does the doctor agree to help. Cohen, on lookout, spots German soldiers entering the village. The commandos dress in white coats and take an ambulance parked outside. At a checkpoint, Fury has the doctor tell an officer that he saw the commandos on Blitzen Lane. The officer orders his men to shell the location, unaware that it is the ammo dump—half the village blows up.
The Howlers drop the doctor at the next crossroads and proceed to Zemo's castle. There is a single guard at the entrance. Pinkerton has an idea: he leaves his guns behind, saunters up swinging his umbrella, and tells the guard that the war is over. The guard believes him, at least long enough for Pinkerton to throw him into the moat. The others proceed to the drawbridge. Dugan, alone, fires at the castle. The other guards emerge and look for Dugan in the woods. Dugan rejoins the squad, who raise the drawbridge.
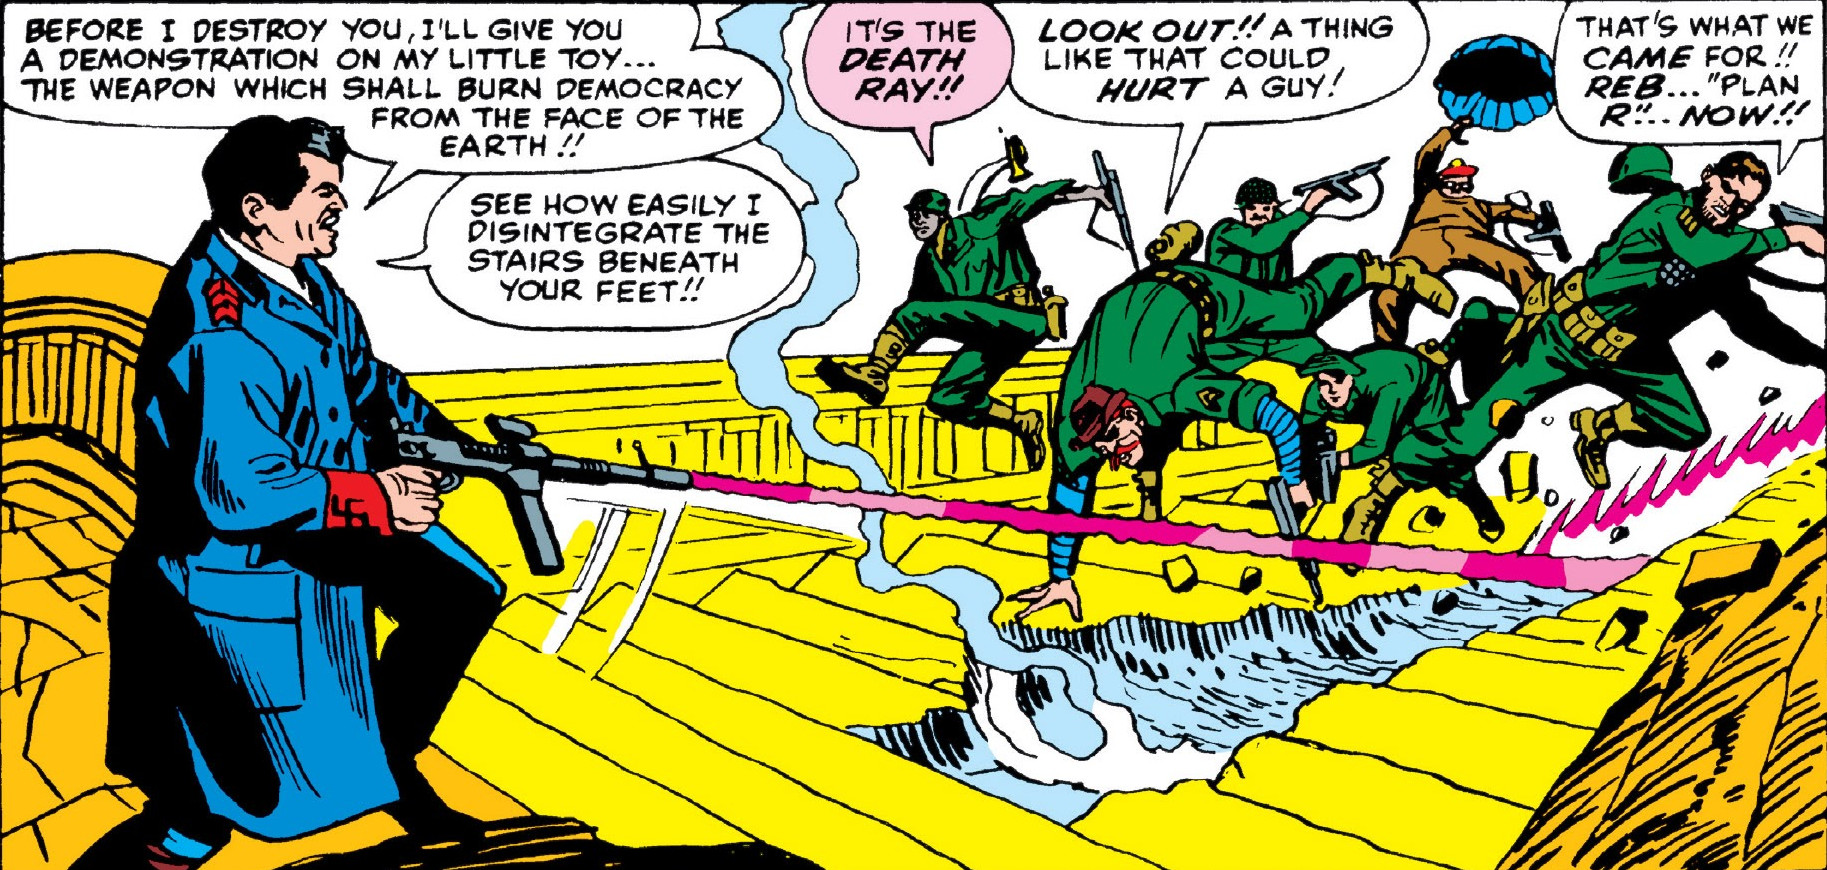
Zemo firing his death ray gun at the Howlers
Zemo sees and hears the commandos on his security system. They defeat his personal guards. Ralston is almost electrocuted by a doorknob. Zemo, over the intercom, demands their surrender. Jones blows his horn into the nearest microphone, deafening Zemo and short-circuiting the intercom. Zemo sets a wall moving to crush them. Cohen finds the circuit box and stops the wall. Zemo comes for them with his death ray and blasts the stairs beneath them. Ralston lassos the ray gun and pulls it out of Zemo's hands.
Zemo flees to the roof, gets in an airplane, lowers the drawbridge by remote control, and escapes. Fury orders Ralston to drop the ray gun and orders everyone to get out of the castle, which explodes. Fury had guessed that Zemo booby-trapped the gun in case he lost it.
Notes
- This issue includes the first letters page, "Tell It to Fury."
- With this issue, Sgt. Fury began appearing monthly. It would not go back to bimonthly until November 1973.
- This time Dr. Zemo doesn´t wear his usual mask.
- This issue is reprinted in other comics and books, see references for more info.[1]
Trivia
- The inker's name is given as "Geo. Bell."
See Also
Links and References
References
- ↑ This story is reprinted in the following comics/TPB's:
- Marvel Masterworks: Sgt. Fury and His Howling Commandos #1